The Pole Vault Pull-Turn with Bill Falk
NPVCA Curriculum #7
Previous: #6 – The Swing-Up
Next: #8 – The Fly Away
Bill Falk teaches the pole vault pull-turn. Once the vaulter's hips have risen at least to the level of the head, the pull-turn is started. The vaulter pulls first, keeping the arms in the same position. As the left arm breaks, the elbow goes on the inside of the pole. The athlete keeps pulling back towards the body as the hips rise. Once the hips are high enough, the athlete is right on the pole. Then, a unit turn is executed. The whole body turns to the left and stays close to the pull and the hips continue rising up. Then, the fly-away is executed. From the Come to Pole Vault Practice DVD.
Pole Vault Pull-Turn Basic Technique
Importance
As the Swing-Up finishes, the Extension Pull-Turn takes over. The vault is almost complete, but you need to put the frosting on the cake to maximize the height. If done well, the Extension Pull-Turn shoots the vaulter upward to a handstand over the top arm to take advantage of the unbending pole. If done incorrectly, the vault is ruined.
Technical Model
The vaulter is inverted, facing forward on a bent pole, as the hips and legs extend upward. The lower arm pulls down towards the hip to continue upward movement and to keep the body straight. (See Figure R). Make sure the lower arm's elbow bends and moves inside the unbending pole. Continue to face forward until the lower arm finishes pulling and upward extension of the body is completed. Then the top arm, which has been straight, begins to pull and the entire body executes a full unit turn around the pole. (to the left for right-handers) Stay close to the pole during the turn. (See Figure S) When the turn is completed, the vaulter will be facing back towards the runway. Keep the legs together and stay close to the pole as you are poised to be thrown upward over the crossbar by the power of the unbending pole.
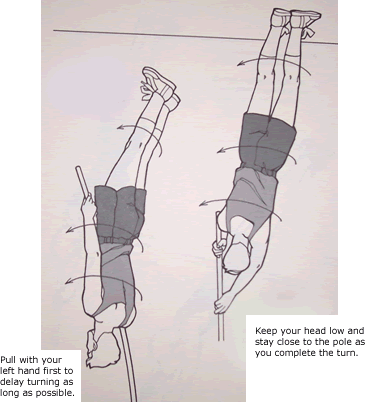
Figures R and S
Drills
1. Use the Vault Trainer or a rope hanging from the ceiling. Face forward, feet together, and grab the rope. Pull yourself upside down, extend the lower body upward then execute a unit turn to a handstand position. (Note: this drill should be done with a mat underneath you.)
2. Use a flexible pole and wedge the tip into a corner. Hold the pole to your left if you are right-handed and face away from the corner. Move your hands up the pole and walk away from the corner until you bend the pole. Then sit down and lift your heels. As the pole begins to unbend, slide across the floor and execute a unit turn on the floor. You will need sweat pants in order to slide across the floor.
Coaching Points
Emphasize that the vaulter should not pull too early, before the hips and legs start upward. That causes the hips and legs to go outward away from the pole instead of up the pole.
Another common fault is moving the top arm across the body too soon instead of keeping it straight above the shoulder. That causes the top of the body to turn prematurely while the lower body stops rising and drives outward, not upward. This is called flagging since the body's angle resembles an American flag.
Teach the vaulter to visualize that there is a basketball hoop above the top of the pole. He or she should try to go straight up through the net and over the basketball rim. This can only be done if the vaulter does not turn too soon.
Previous: #6 – The Swing-Up
Next: #8 – The Fly Away